How to Make Vechile Finger Puppets (Part 2)
This post contains affiliate links, which means I may earn a small commission at no additional cost to you if you click through the link and make a purchase. For more information, click here.
Let’s craft together! These fun transport finger puppets are a fun way to encourage creativity and imagination of kids of all ages. The vehicle puppets are sewed with a sewing machine using a straight stitch along with little embroidery. Also, hand sewing is possible. I have already shared the free photo tutorial on how to make finger puppets for the ship, truck, plane, and train in the Vehicle Finger Puppet Tutorial (Part 1). Now I will show you how to make transport finger puppets for the car, scooter, rocket, and hot air balloon.
Happy felt craft sewing!

General Instructions Transport Finger Puppets
These transport felt finger puppet are sewed with a sewing machine using a straight stitch along with little embroidery. A straight stitch, and french knot are the hand embroidery stitches employed.
If you are going to sew the finger puppets entirely by hand, use the whip stitch whenever the pattern calls for a sewing machine straight stitch.
Visit the guide on hand embroidery stitches if you like to learn more about the embroidery stitches.
Instructions follow to make the vehicle finger puppets. The finished puppets are approximately 2.6 ” (6.6 cm) tall. The puppets are made from scraps of felt.
Finger puppets are not recommended for children under the age of 3.
This pattern includes the free actual-size template to make the car, scooter, rocket, and hot air balloon finger puppet, a material and supply list, easy-to-follow instructions, with photos.
Use three-strand of embroidery floss whenever the pattern calls for embroidery.
Knot thread ends on the wrong side of felt.
TIP: Felt pieces can be pinned to body shapes to hold them in place until they are stitched. Other options are applying a tiny dab of fabric glue on back of shapes or small piece of double-sided instant tape and position them based on pattern - be careful not to get glue anywhere you are going to sew because it’s difficult to insert the sewing needle through the dried glue.
TIP: If you like to learn some tips on how to cut out felt pieces, you can read my post about 6 techniques for cutting felt shapes.
TIP: You are welcome to read how to trace on felt post if you want to learn more about transferring the pattern on felt for embroidery.
TIP: There is a small tutorial on my website on how to sew two pieces of felt together. The double-layer pieces are used a lot in finger puppets’ sewing.
Printing your vehicle finger puppet template
The template is designed to be printed on US letter paper at 100%. Make sure that the “fit to page” option is not checked in in your printer options.
On the first page, you will find a 1-inch square test box. The box serves as a check if the template is printed in a right size.
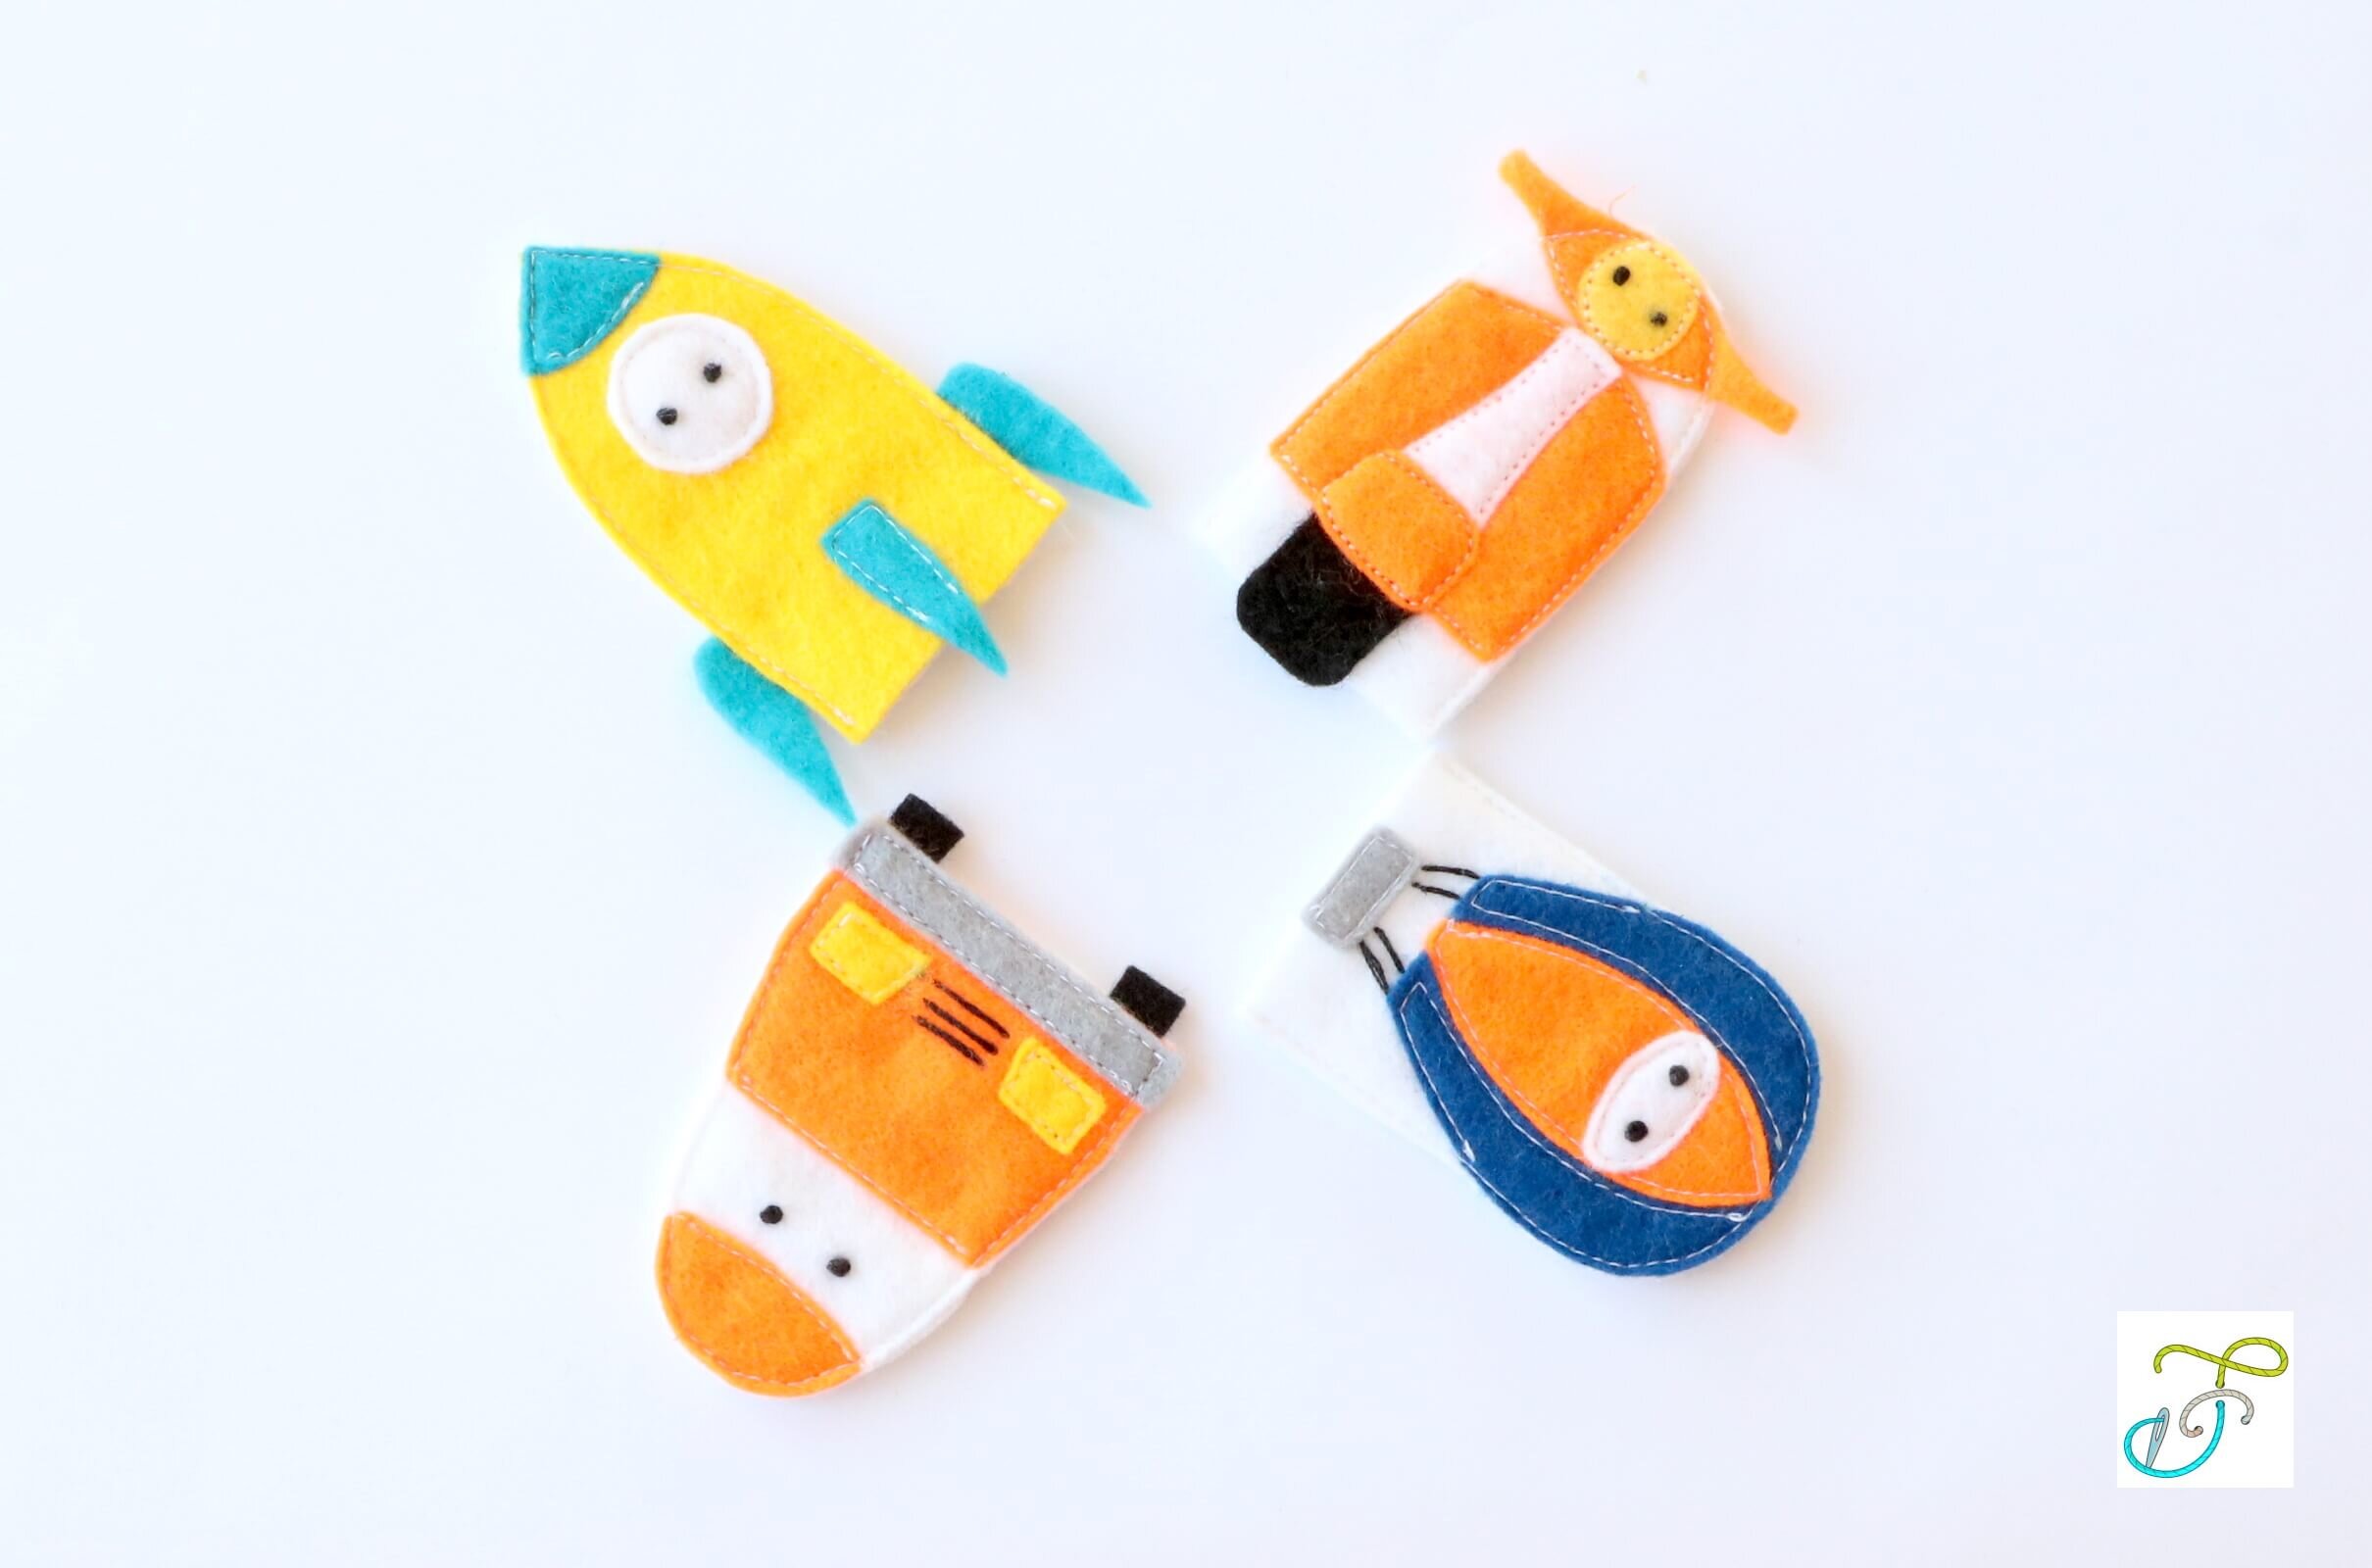
DIY Transport Finger Puppets - Rocket, Scooter, Hot Air Balloon and Car Finger Puppets with Free Pattern
Materials & Supplies Transport Finger Puppets
felt scraps: white, orange, blue, dark blue, grey, black, yellow
sewing machine thread white
embroidery floss: black
small or embroidery scissors (these are the ones I use)
pins (optional - these are my favorites) or Clover wonder clips (optional)
fabric glue (optional) or double sided instant hem tape (optional)
tracing paper (optional - Check out my tutorial to learn more on tracing a pattern using a tracing paper)
freezer paper (optional - Check out my tutorial to learn how to use freezer paper for cutting precise shapes from felt)

HOW TO MAKE A CAR FINGER PUPPET
1. Use the vehicle finger puppet template (part 2) to cut out all of the pieces from felt. The car finger puppet shapes are: car shape (white), bodywork pieces (orange), bumper (grey), lights (yellow), and wheels (black).

2. Following the car finger puppet diagram, pin/attach bodywork to the car shape. Sew bottom line on upper bodywork and upper line on bottom bodywork.


3. Continue by pinning/attaching the bumper and wheels. Place the wheels in between the bodywork and the car shape. Sew upper and bottom edge of the bumper.

4. Following the car finger puppet diagram, pin/attach lights to the bodywork. Sew close to the edges.

5. Embroider the eyes with three strands of black floss using a french knot. I wrap the thread three times around the needle to make the eyes more significant. Next, embroider the radiator grille with 3 straight stitches.

6. Place the car finger puppet’s body shape on a matching felt scrap. Sew around the car, leaving the bottom edge open. Cut the felt scrap to match the car shape. Your DIY: car finger puppet made with Fun Cloth Crafts free pattern is ready for its happy owner.


Car finger puppet
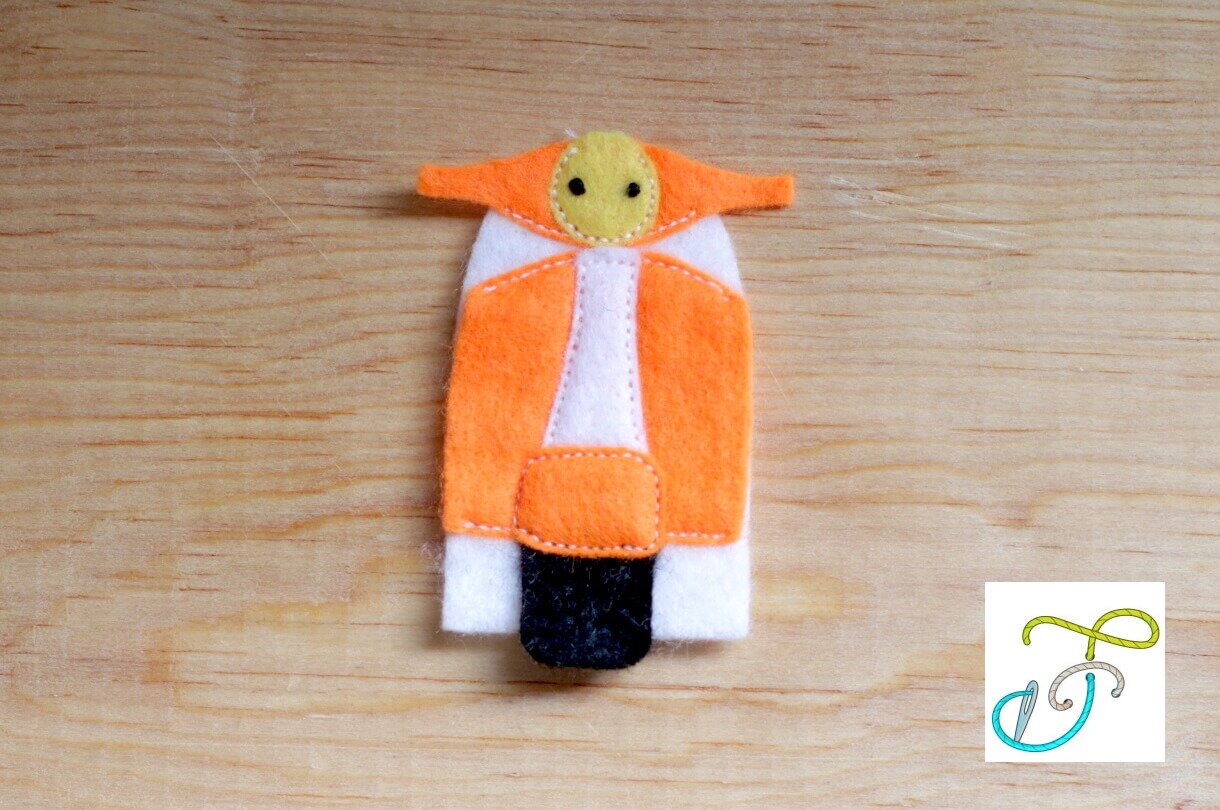
HOW TO MAKE A SCOOTER FINGER PUPPET
1. Use the vehicle finger puppet template (part 2) to cut out all of the pieces from felt. The scooter finger puppet shapes are scooter shape and front panel (white), bodywork pieces (orange), head light (yellow), and wheel (black).

2. Following the scooter finger puppet’s diagram, pin/attach upper bodywork piece to the front of scooter shape. Sew bottom line on upper bodywork.

3. Pin/attach head light. Note that pins might be helpful to indicate the borders of sewing. Sew the head light on upper body work.


4. Pin/attach the lower bodywork to the scooter’s shape following the diagram and sew upper and bottom edge.

5. Pin/attach the front panel to the bodywork piece. Sew around the panel leaving bottom edge open.

6. Following the scooter’s finger puppet diagram, embroider the wheel on the scooter shape using straight stitches.

7. Pin/attach the central bodywork piece, and sew around it.

8. Trace the eyes on the scooter finger puppet. Embroider the eyes with three-strands of black floss using the french knot.
9. Place the scooter finger puppet’s shape on a scrap of matching felt. Sew around the scooter leaving bottom edge open. Cut the felt scrap to match the scooter finger puppet’s shape. Your DIY: scooter finger puppet made with Fun Cloth Crafts free pattern is ready for its happy owner.


Scooter finger puppet
HOW TO MAKE A ROCKET FINGER PUPPET
1. Use the vehicle finger puppet template (part 2) to cut out all of the pieces from felt. The rocket finger puppet shapes are rocket shape (yellow), cone and fins (blue), and window (white).

2. Following the rocket finger puppet diagram, pin cone and middle fin to the front of the rocket shape. Sew bottom line on the cone. On the middle fin, sew upper line and side lines with a straight stitch to attach it to rocket shape.


3. Then pin/attach window, sew around the window to attach it to the rocket shape.

4. Trace the eyes on the rocket finger puppet. Embroider the eyes with three strands of black floss using french knot.

6. Place the rocket including the side fins on a scrap of matching felt. Sew around the rocket leaving bottom edge open. Cut the felt scrap to match the rocket shape. Your DIY: rocket finger puppet made with Fun Cloth Crafts free pattern is ready for its happy owner.


Rocket finger puppet
HOW TO MAKE A HOT AIR BALLOON FINGER PUPPET
1. Use the vehicle finger puppet template (part 2) (find it in Materials & Supplies) to cut out all of the pieces from felt. The hot air balloon finger puppet shapes are the hot air balloon shape (white), window (white), basket (grey), middle panel (orange), and side panels (dark blue).

2. Following the hot air balloon finger puppet diagram, pin the basket to the front of the hot air balloon shape. Sew close to the edges with a straight stitch to attach it to the hot air balloon shape.

3. Then pin/attach the panels to the hot air balloon shape and sew them in place. Sew around the middle panel close to the edges. For the blue panels, sew the inner edge, bellow edge, and part of the outside edge.


4. Following the hot air balloon finger puppet template, pin and sew the window.

5. Trace the eyes and the four cords on the hot air balloon finger puppet. Embroider the eyes with three-strands of black floss using a french knot. As for the four cords, stitch 4 straight lines with the same black floss.

6. Place the hot air balloon finger puppet’s shape on a scrap of matching felt. Sew around the hot air balloon shape leaving bottom edge open.


7. Cut the felt scrap to match the hot air balloon’s shape. Your DIY: hot air balloon finger puppet made with Fun Cloth Crafts free pattern is ready for its happy owner.

Hot air balloon finger puppet


The complete set of eight vehicle finger puppets (part 1 and part 2)
You made your vehicle finger puppets
Your ‘Vehicle finger puppets’ are finished :) I’m sure yours turned out adorable! Lots of fun playing!
Be sure to visit more on this website for free embroidery and sewing tutorials to help you out as you stitch my patterns.
Feel free to join my mailing list! You’ll receive updates on new patterns, the latest tips & tricks, and special promotions.
I would love to see your finished projects. So if you like to share it, please send me your pictures. I welcome any feedback as it is important to make my products better. Don't hesitate to contact me with your suggestions at anna@funclothcrafts.com.
Let’s craft together!
XO, Anna
Copyright 2021 by Fun Cloth Crafts
Pattern may be copied for noncommercial use only. You can use it to make as many Vehicle finger puppets as you want for yourself or as gifts, but please don’t make any for sale.